Protect Your Phone: 5 Unexpected Sand & Saltwater Tips

To safeguard your phone from sand and saltwater damage during beach travel, consider unconventional methods beyond basic waterproofing, focusing on creative barriers and immediate post-exposure care.
Venturing to the beach promises sun, surf, and relaxation. However, this idyllic setting poses significant threats to our indispensable companions: smartphones. While many are aware of the risks, few truly grasp the extent of damage sand and saltwater can inflict, or the innovative measures available to prevent them. This article delves into 5 Unexpected Ways to Protect Your Phone from Sand and Saltwater Damage, ensuring your device survives your coastal adventures.
Beyond Waterproof Cases: The Everyday Heroes
When planning a beach trip, the immediate thought for phone protection often gravitates towards a heavy-duty waterproof case. While these are undeniably effective, they aren’t the only solution, nor are they always convenient or aesthetically pleasing. Sometimes, the best defenses are found in common household items or simple, overlooked techniques. These unexpected methods can offer a surprising degree of protection without the bulk or expense of specialized gear, providing peace of mind when you’re caught off guard by an enthusiastic wave or a gust of wind.
Understanding the nuances of how sand and saltwater attack your device is crucial for effective prevention. Sand, even the finest grains, can abrade screens, clog ports, and infiltrate internal components, leading to overheating or irreversible damage. Saltwater, on the other hand, is highly corrosive and conductive. It causes immediate short circuits and, if not thoroughly cleaned, leaves behind salt crystals that accelerate corrosion, turning delicate circuitry into brittle, non-functional remnants. The combination of these two elements creates a particularly hostile environment for electronics.
The Humble Ziploc Bag: More Than Just a Sandwich Holder
One of the simplest yet most effective barriers against both sand and splashes is a common re-sealable plastic bag. Often underestimated, a heavy-duty freezer bag can create a surprisingly tight seal, keeping the elements at bay. While it won’t allow for submerged photography, it’s perfect for keeping your phone safe in your beach bag, within reach for quick photos, or even for light use near the water’s edge. This basic item provides a first line of defense that is both cost-effective and readily available.
- Double Bagging: For extra security, place your phone in one Ziploc bag and then put that bag into another. This practice adds an additional layer of protection against punctures or seal failures.
- Air Removal: Before sealing, press out as much air as possible. This reduces bulk and ensures the bag stays snug against your phone, minimizing movement and potential stress on the seal.
- Touchscreen Functionality: Modern touchscreens typically work through the plastic of a Ziploc bag, allowing you to answer calls, send texts, and even take photos without exposing your device.
This method, while low-tech, offers a fantastic balance of protection and usability. It’s an ideal interim solution or a backup for more robust cases. The key is to ensure the bag is completely dry before inserting your phone and to check the seal meticulously. Its disposability also means you don’t have to worry about cleaning a sandy, salty case after your beach day, simply discard the bag and your phone remains pristine.
Silica Gel Packets: The Moisture Magnets
We’ve all seen those tiny packets labeled “Do Not Eat” tucked into new shoe boxes or electronics packaging. These are silica gel packets, and they are powerful desiccants, meaning they absorb moisture from the air. While they won’t protect your phone from a direct dunk in the ocean, they are invaluable for combating less obvious forms of moisture damage and as an immediate post-exposure recovery tool. Their moisture-absorbing properties make them a surprising ally in preserving your device’s longevity, especially in humid beach environments where invisible moisture can silently wreak havoc.
The insidious nature of humidity often goes unnoticed until it’s too late. High moisture content in the air, especially after a sudden change in temperature, can lead to condensation inside your phone. This internal moisture can corrode delicate circuits over time, leading to intermittent problems or complete failure. While a visibly wet phone is an obvious concern, ambient humidity is a silent killer, slowly degrading your device’s components without any clear external signs. This is where silica gel packets shine, offering a proactive defense against this invisible threat. Their ability to draw moisture out of an enclosed space can be a game-changer.
Pre-emptive Protection in Humid Climates
Even if your phone never touches the sand or water, the humid beach air can still be detrimental. Storing your phone with a few silica gel packets in a sealed container, like a hard-shell case or a sealed plastic box, can significantly reduce the internal humidity around the device. This proactive measure helps prevent condensation from forming inside your phone, especially when moving between air-conditioned indoor spaces and the hot, humid outdoors. This simple trick can extend the life of your phone by keeping its internal environment consistently dry.
- Travel Container: When packing for the beach, place your phone in a sealed container (e.g., a small plastic food container or a dry bag) along with 5-10 silica gel packets.
- Reactivatable Packets: Many silica gel packets are reusable. You can reactivate them by baking them in a low oven (around 200°F or 90°C) for a few hours. This makes them a sustainable solution.
- Emergency Kit: Always keep a small bag of fresh silica gel packets in your beach bag. They are far more effective than rice for drying out a wet phone.
Beyond prevention, silica gel packets are an excellent first response for a phone that has encountered minor splashes or excessive humidity. If you notice any signs of moisture, such as a foggy screen or erratic behavior, immediately power off your phone, remove the SIM card tray, and place it in a sealed container filled with silica gel packets for at least 24-48 hours. This swift action can often draw out enough moisture to save your device, providing a second chance where rice often fails.
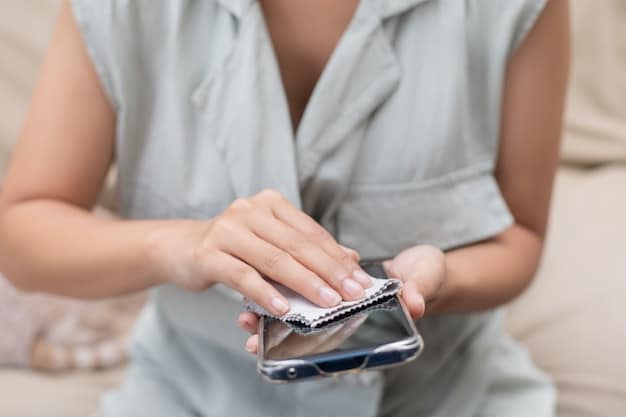
The Power of a Microfiber Cloth and Soft Brush
It’s inevitable: sand will find its way onto your phone, no matter how careful you are. The real damage often occurs when you try to wipe it off incorrectly. Rubbing sand with a coarse cloth or your fingers can scratch the screen and body. The key is to understand that sand, much like tiny pieces of glass, is highly abrasive. Therefore, proper cleaning techniques are not just about aesthetics but about preserving the integrity of your device’s delicate surfaces and ports. A simple microfiber cloth, an item often overlooked, can be your phone’s best friend on the beach, preventing microscopic damage before it escalates.
Unlike regular cloths or paper towels, microfiber cloths are specifically designed to trap tiny particles without scratching. Their unique structure allows them to lift dirt and dust away rather than just pushing it around. When combined with a soft-bristle brush, like a clean, dry paintbrush or a soft toothbrush, you have a formidable duo for tackling sand. The brush is crucial for reaching those difficult nooks and crannies where sand loves to hide, such as charging ports, speaker grilles, and button crevices, areas that are often the first to succumb to persistent sand intrusion.
Gentle Cleaning Techniques
When sand inevitably lands on your phone, resist the urge to wipe it vigorously. Instead, adopt a delicate, methodical approach. The goal is to remove the abrasive particles without causing friction-induced scratches. This technique extends the life of your screen and maintains the phone’s aesthetic appeal. A gentle hand and the right tools make all the difference, transforming a potentially damaging cleaning attempt into a safe and effective one. This process requires patience but yields the best results.
- Blow First: Gently blow off any loose, visible sand before touching the surface. Avoid using compressed air, as its high pressure can force sand deeper into ports or internal components.
- Brush Away: Use a soft-bristle brush to carefully dust off sand from ports, speaker grilles, and around buttons. Brush outwards, away from the openings.
- Microfiber Wipe: Once the loose sand is removed, lightly wipe the screen and body with a clean, dry microfiber cloth. Avoid pressing hard. If necessary, slightly dampen a corner of the cloth with fresh water (not saltwater) to remove stubborn smudges, then dry immediately.
Regularly cleaning your phone, even if it appears clean, is a smart habit to adopt when at the beach. Microscopic sand particles can accumulate over time, leading to gradual wear and tear. By consistently employing these gentle cleaning techniques, you can significantly reduce the risk of scratching and internal clogging, keeping your phone looking and functioning like new, even after multiple beach excursions. Prevention through diligent care is always superior to attempting a repair after the damage is done, saving you time, money, and frustration in the long run.
The Forgotten Case: Hard-Shell Eyeglass Cases
Your old hard-shell eyeglass case, gathering dust in a drawer, might just be your phone’s next best friend at the beach. These cases are designed to be durable, rigid, and often lined with a soft material, making them an excellent impromptu protective shell against impact, scratches, and, crucially, sand. Their sturdy construction provides a robust barrier that many flexible phone pouches simply cannot match. This often-overlooked item offers a perfect blend of portability and protection, ideal for quick dips in the ocean or when you just need to stash your phone safely for a short period while you enjoy the sun.
Beyond their robustness, hard-shell eyeglass cases often provide a snug fit for many smartphone models, especially smaller ones. The rigid exterior acts as a formidable shield against accidental drops onto hard surfaces or impacts from other items in your beach bag. Moreover, the secure closure mechanism common to these cases helps keep fine beach sand from infiltrating, offering a much more reliable seal than open pockets or soft pouches. This dual protection against physical trauma and environmental elements makes them a surprisingly effective, budget-friendly option for beach-goers. It’s an ingenious repurposing of an everyday item into a critical, protective accessory.
Repurposing for Protection
The beauty of the eyeglass case method lies in its simplicity and effectiveness. It’s a quick, easy way to provide a decent level of protection without investing in specialized gear. While it may not offer complete waterproofing, it excels at keeping out abrasive sand and preventing accidental bumps or drops that can lead to disastrous consequences for your device. This low-tech solution is particularly useful for those moments when you step away from your beach blanket for a swim or a walk and want to ensure your phone remains untouched by the elements.
- Secure Storage: Great for stashing your phone when you’re not actively using it, protecting it from flying sand, accidental kicks, or being buried under a towel.
- Impact Resistance: The hard shell offers a good degree of protection against minor drops and impacts, far better than leaving your phone exposed or in a soft cloth bag.
- Sand Barrier: The tight-fitting lid helps prevent sand from entering the case and reaching your phone’s ports and screen.
This method is particularly effective when combined with other strategies, like placing your phone in a Ziploc bag before inserting it into the eyeglass case. This creates a multi-layered defense system: the Ziploc bag handles moisture and fine particles, while the hard case provides structural protection against crushing or impact. Such layering ensures comprehensive coverage, addressing various threats simultaneously. Before embarking on your beach adventure, give your old eyeglass case a new purpose, transforming it into an essential component of your phone’s beach survival kit.
The DIY Vacuum Seal: A Simple, Innovative Barrier
Imagine creating a custom-fit, temporary waterproof and sand-proof seal around your phone using just a few common household items. This is the essence of a DIY vacuum seal, an ingenious yet often overlooked method for providing surprisingly robust protection. While it sounds complex, it’s remarkably simple and leverages basic principles of air pressure to create a tight, impermeable barrier around your device. This technique offers a level of security that goes beyond mere bags, creating an almost form-fitting second skin for your phone, making it ideal for those who want to use their device with minimal exposure risks.
The primary benefit of a DIY vacuum seal is its ability to eliminate air pockets around your phone, which can trap moisture or allow fine sand to migrate. By drawing out the air, you effectively seal the phone more tightly within its protective layer, whether that’s a specialized case or even a heavy-duty plastic bag. This method reduces condensation and prevents the accumulation of insidious sand particles that can wreak havoc on ports and buttons. It’s a proactive measure that enhances the effectiveness of other protective layers, giving you greater confidence in challenging beach conditions.
Creating Your Own Vacuum Seal
This technique doesn’t require a professional vacuum sealer. Instead, it relies on a simple trick involving water displacement or strategic air removal. The goal is to achieve a snug fit that leaves no room for sand or water to penetrate. While it might take a couple of attempts to perfect, the peace of mind it offers is well worth the minimal effort. This method is particularly effective for those who plan to be near the water’s edge and want to quickly check their phone without worrying about accidental splashes.
- Water Displacement Method: Place your phone in a heavy-duty Ziploc bag (ensure it’s completely dry). Partially seal the bag, leaving a small opening. Slowly submerge the bag (without your phone getting wet) into a basin of water, allowing the water pressure to push the air out from the opening. Once most of the air is out, fully seal the bag before removing it from the water.
- Straw Method: Place your phone in a Ziploc bag and seal it almost completely, leaving just enough room for a straw. Insert the straw into the small opening and suck out the air. Quickly remove the straw and seal the bag entirely.
- Check for Integrity: Always test your seal with a piece of tissue paper inside the bag before placing your phone in it. This ensures no air or water can ingress.
The DIY vacuum seal, when executed correctly, can offer a surprisingly high level of protection against both sand and water splashes. It’s particularly useful if you need to carry your phone in a backpack or bag where it might be subjected to jostling or accidental contact with liquids. While not a substitute for professional waterproofing, it’s an ingenious, temporary solution for enhanced safety. Remember, vigilance and caution are paramount; these methods are about reducing risk, not eliminating it entirely. Always treat your phone with care, especially in challenging environments like the beach.
The Overlooked Power-Off Protocol
When facing the threat of sand or saltwater, our immediate instinct is often to protect the device that’s on. However, one of the most effective and unexpected ways to protect your phone from severe damage is to simply turn it off. This isn’t just about saving battery; it’s a critical safety measure that significantly reduces the risk of short circuits and internal damage if your phone unexpectedly encounters moisture. An active phone, with electricity flowing through its circuits, is far more vulnerable to catastrophic failure when exposed to conductive liquids like saltwater. This simple act of powering down can be the difference between a recoverable incident and an irreversible one, yet it is often the last thing people consider.
Think of your phone as a miniature city of delicate electronics. When it’s on, electricity is constantly flowing through its myriad pathways. If saltwater, which is a powerful conductor, enters this system, it creates immediate, uncontrolled connections (short circuits) that can fry components instantly. Turning off your phone cuts this power flow, essentially putting the city to sleep. While saltwater can still cause corrosion over time even when off, the immediate, destructive electrical damage is significantly mitigated. This principle is why electronics manuals always advise powering down devices before cleaning or maintenance, highlighting the importance of de-energizing sensitive circuits.
Immediate Action Protocol
If your phone has even a suspected encounter with water or excessive dampness, powering it off immediately should be your first and most crucial step. Do not attempt to use it, charge it, or even check if it’s working. Every second that power flows through a wet circuit increases the likelihood of permanent damage. This quick, decisive action can provide a vital window of opportunity for drying out the device and potentially saving it from fatal internal corrosion. It’s a race against time, and powering off buys you precious moments.
- Don’t Test It: Resist the urge to press buttons or check if the screen lights up. Any electrical activity can exacerbate damage.
- Remove SIM/SD Cards: If possible for your model, power off and remove the SIM card tray and any external memory cards. This creates additional points for moisture to escape.
- Avoid Heat: Do not use hair dryers or ovens to dry your phone. Extreme heat can warp components and melt glue, causing more harm than good. Instead, opt for air drying or desiccants like silica gel packets.
After powering off, your next step should be to remove as much external moisture as possible with a clean, dry cloth. Then, place your phone in a sealed container with a substantial amount of silica gel packets for at least 48 to 72 hours. This extended drying period allows the desiccant to draw out even the most stubborn internal moisture. Only after this rigorous drying period, and with careful consideration, should you attempt to power on your phone. This overlooked protocol is not just an unexpected tip; it is often the ultimate unexpected lifesaver for your beloved device when facing the harsh realities of the beach environment.
| Key Protection Tip | Brief Description |
|---|---|
| 🎒 Double Ziploc Bag | Create a cost-effective, immediate barrier against sand and splashes with two sealed plastic bags. |
| 💧 Silica Gel Packets | Absorb ambient moisture and aid in post-exposure drying, preventing internal condensation and corrosion. |
| 🖌️ Microfiber & Brush | Gently brush and wipe away sand from surfaces and ports without scratching or pushing particles deeper. |
| 🔌 Power-Off Protocol | Immediately power off your phone upon water contact to prevent short circuits and mitigate internal damage. |
Frequently Asked Questions About Phone Protection
▼
Phones labeled “water-resistant” (e.g., IP67, IP68) can withstand splashes and brief submersion in fresh water, but saltwater is highly corrosive and can degrade seals and components. These ratings typically refer to fresh water under controlled conditions, not the harsh environment of a beach with abrasive sand and corrosive saltwater. Always exercise caution and add extra protection.
▼
While rice is often suggested, it’s largely ineffective. It absorbs surface moisture but struggles with internal moisture and can even introduce dust or starch into ports. Silica gel packets, designed as industrial desiccants, are far more efficient at drawing out moisture from within electronic devices. They are a superior and safer option for drying a wet phone.
▼
Fine sand particles can penetrate tiny openings like microphone holes, speaker grilles, and charging ports. Once inside, they can clog internal mechanisms, interfere with charging pins, abrade delicate circuit boards, and even cause overheating by insulating components. Even microscopic grains can lead to cumulative damage over time, affecting performance and durability.
▼
Immediately power off your phone. Do not attempt to turn it on or charge it. If safe to do so, briefly rinse it with fresh (not saltwater) tap water to remove corrosive salt. Gently pat it dry with a towel, then place it in a sealed container with silica gel packets for at least 48-72 hours. Seek professional repair if issues persist.
▼
Touchscreen gloves themselves don’t protect against sand or saltwater directly. However, they allow you to operate your phone while it’s safely tucked inside a clear protective pouch or Ziploc bag, minimizing direct exposure of your fingers to the screen. This reduces the transfer of sand and oil from your hands to the phone, adding an indirect layer of protection.
Conclusion
Navigating the beautiful yet challenging environment of the beach with your smartphone requires more than just basic precautions. By incorporating these 5 Unexpected Ways to Protect Your Phone from Sand and Saltwater Damage, you can significantly enhance your device’s longevity and safeguard precious memories. From the humble Ziploc bag to the meticulous use of silica gel and the crucial power-off protocol, these methods offer layers of defense often overlooked. Adopting these ingenious strategies empowers you to enjoy your beach excursions without the constant anxiety of a damaged device, ensuring that your coastal adventures remain delightful, not disastrous.


